

Quick Answer
For silicone sex doll repair, first remove tension, confirm the exact silicone body or head, photograph the damage, and ask for the manufacturer-approved adhesive, pigment, and curing method. A surface tear, paint loss, loose nail, seam change, gel issue, and exposed skeleton are different repairs. Do not use TPE solvent, household glue, bathroom sealant, or heat as a shortcut.
The right goal is a stable, material-compatible repair. A perfect cosmetic result may require a trained technician, especially on visible painted areas.
Identify The Type Of Silicone Damage
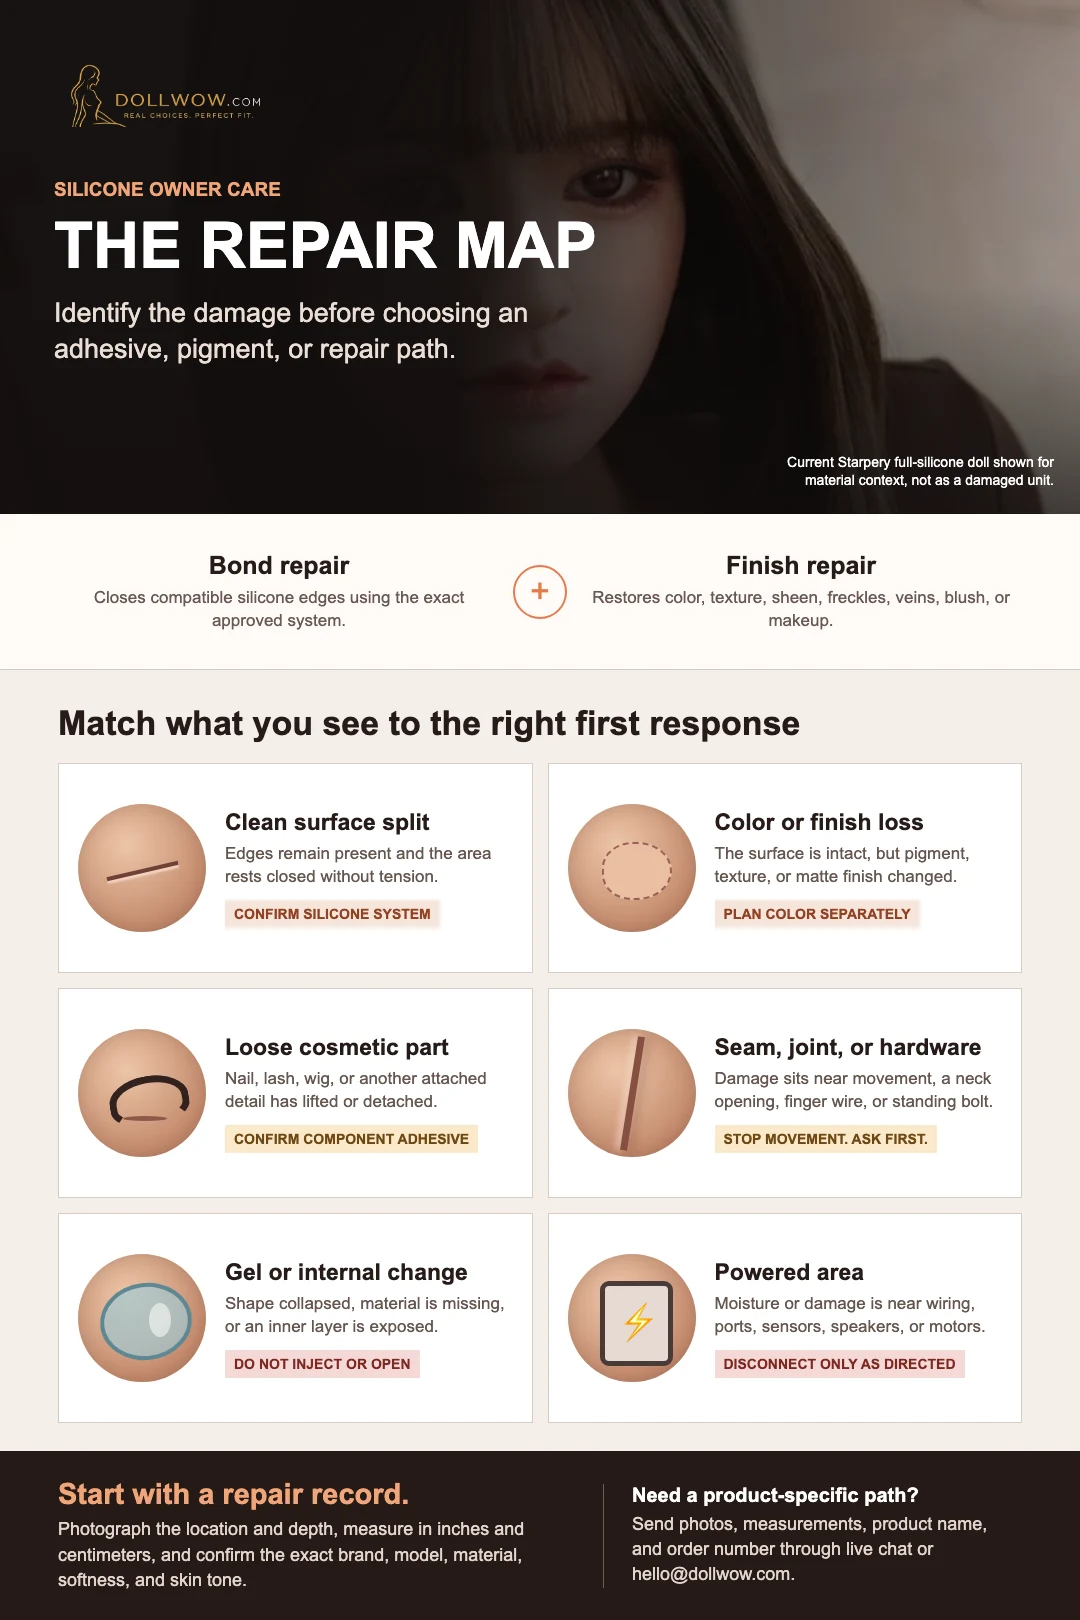
| What you see | Likely category | First response |
|---|---|---|
| A clean, shallow split with the edges present | Minor tear | Relax the area, photograph it, and confirm the compatible silicone system |
| A change at a mold seam or neck opening | Seam or connection concern | Stop loading the area and request model-specific guidance |
| Color rubbed away but the surface remains intact | Paint or finish loss | Do not use structural glue; request a color and finish plan |
| A loose nail, lash, wig, or cosmetic component | Attachment repair | Confirm the component-specific adhesive |
| A puncture, missing material, or exposed inner layer | Complex repair | Protect the area and escalate before filling or cutting |
| A collapse or change in gel-filled breasts or buttocks | Internal fill concern | Do not inject or open the body without manufacturer support |
| A change beside a joint, standing bolt, finger wire, or toe | Structural or high-stress concern | Stop movement and request repair coordination |
| Moisture, damage, or heat near electronics | Powered-system concern | Disconnect power where the manual permits and do not open the system |
Silicone firmness, paint system, softness, gel filling, and internal construction can vary between brands and even between product lines from one manufacturer.
Build A Repair Record First
Take clear photographs before cleaning or applying any product:
- One wide image showing the body area.
- One close image from directly above.
- One side angle showing depth and whether edges are missing.
- A ruler beside the concern without stretching it, recording inches and centimeters.
- A note describing when it appeared and whether it changed after movement.
- The brand, model, order number, skin tone, material, softness option, and product link.
- Any nearby seam, paint, joint, connector, heater, sensor, speaker, or standing hardware.
Keep these records with the order or Doll Passport. They help the support team match an adhesive or pigment and identify whether the repair can be handled at home.
Confirm Which Part Is Silicone
A full-silicone doll uses silicone for the body, but many hybrid dolls use a silicone head on a TPE body. A head tear and a body tear may therefore require different products on the same doll.
Check the product page, order configuration, care manual, and written confirmation. If the description says “silicone head,” do not infer that the entire body is silicone.
Read the silicone sex doll guide for construction differences and the TPE versus silicone guide when the material is uncertain.
Why Silicone Repair Glue Is Not Universal
Silicone repairs can involve a compatible adhesive or two-part system, color-matched material, surface preparation, controlled alignment, and enough curing time. The correct choice may depend on:
- platinum-cure or another manufacturer-defined silicone system
- the body's softness or firmness
- skin tone and surface pigmentation
- the depth and location of the damage
- whether the area bends, stretches, or bears weight
- whether gel, foam, skeleton, wiring, or hardware sits beneath it
- the surrounding matte, textured, glossy, or painted finish
Do not use hardware-store silicone caulk, bathroom sealant, household super glue, nail glue, TPE solvent, craft adhesive, or an unverified marketplace kit. A product can adhere initially while leaving a hard edge, oily residue, discoloration, poor curing, or an impossible finish match.
A Conservative Minor-Tear Workflow
This sequence helps owners prepare for a supported repair. The exact mixing, application, and curing instructions must come from the approved product.
1. Stop movement and remove tension
Support the doll so the tear rests naturally. Relax nearby joints and keep clothing, straps, or storage pressure away from the area.
2. Inspect under neutral light
Determine whether the edges are present, paint is missing, the split reaches an internal layer, or the damage follows a seam. Do not repeatedly open the tear to inspect it.
3. Clean only with the approved preparation method
The surface generally needs to be clean and dry, but a faceup, painted body detail, matte finish, and electronic component can change what is safe. Avoid alcohol, acetone, bleach, aggressive cleaners, and unknown solvents unless the exact manufacturer explicitly directs their use.
4. Confirm adhesive, color, and softness compatibility
A repair product for one brand or firmness is not proof of compatibility with another. Ask whether the kit needs a color choice, catalyst, quick-dry component, pigment, or separate finish step.
5. Practice on an approved sample when possible
A matching silicone test piece can reveal working time, color, cured softness, and finish behavior. A random craft sample cannot duplicate the doll's complete construction.
6. Follow the supplied quantity and alignment method
Use the approved applicator and protect surrounding paint. More product is not necessarily stronger. Keep all repair materials away from human skin, eyes, mouth, and mucous membranes, and follow the label's ventilation and personal-protection directions.
7. Support the repair for the full curing period
Do not flex, dress, clean, heat, powder, or put pressure on the area until the manufacturer-defined cure is complete. Surface dryness alone is not a reliable test.
8. Review the bond and finish separately
A structurally closed tear may still need cosmetic work. If the surface remains raised, tacky, discolored, rigid, or open under neutral positioning, stop before adding more material.
Paint And Finish Repair
Silicone dolls can use layered pigments, hand-painted details, freckles, veins, blush, areola color, facial makeup, and textured finishes. Structural adhesive will not automatically restore those layers.
A useful finish-repair plan identifies:
- the exact skin tone and paint system
- whether color was transferred, rubbed away, or chemically changed
- the area and visibility of the damage
- whether the surface texture remains intact
- whether the manufacturer supplies matching pigment
- how the finish is sealed or protected
Do not experiment first on the face, hands, feet, or another highly visible area. A professional color blend can be more appropriate than repeated home touch-ups.
Seam, Joint, Finger, Toe, And Standing-System Damage
Damage near a moving or load-bearing area deserves a higher repair threshold. A split may reopen if the joint range, standing setup, storage position, or lifting method continues to stress it.
Before any repair:
- stop moving the related joint
- support the doll's weight
- photograph the seam or hardware around the damage
- note any change in joint resistance or alignment
- check whether wire or skeleton is visible
- ask whether reinforcement or professional work is required
Do not stitch silicone, insert wire, add staples, cut around a seam, or force adhesive into an internal cavity.
Gel-Filled Areas And Internal Repairs
Some silicone dolls use gel-filled breasts or buttocks, foam cores, skeleton structures, heating systems, or other internal components. A change in shape does not establish the cause, and an injection method for one product may damage another.
Irontech publishes a separate AB-gel process for certain Irontech gel-filled products and warns that the effect of alternative materials is unknown. That is a good example of why an owner should not copy an injection process to a different brand or body.
Needles, cutting, injection, internal filling, and opening the body are escalation points. Send photographs and product details before proceeding.
Electronics And Powered Heads
Keep liquid repair products away from charging ports, speakers, wiring, sensors, cameras, motors, and battery compartments. Disconnect power only as the manual permits. Do not open a powered head or body to chase a surface issue.
Document the visible damage and any change in function separately. A cosmetic repair cannot establish that an electronic system remains safe or operational.
Loose Nails, Lashes, Hair, And Components
A detached nail is not the same repair as a body tear. Lashes, wigs, implanted hair, eyes, oral components, and face parts can use different attachment systems.
Before reattaching anything, confirm:
- the component and original attachment method
- whether old adhesive should be removed
- whether paint or silicone lifted with the component
- the correct adhesive and amount
- alignment and curing instructions
- whether movement should be avoided afterward
Never use body repair adhesive near an eye, mouth, powered head, or implanted-hair area without explicit guidance.
When Home Repair Is Not The Right Choice
Stop and request help when:
- the tear is deep, growing, or missing material
- an internal layer, skeleton, wire, gel, foam, or hardware is visible
- the damage crosses a seam or sits over a joint
- a previous repair failed or became rigid
- color matching is important on a prominent area
- the body uses an electronic or heating system
- the silicone type, softness, or finish is unknown
- the method requires injection, cutting, opening, or internal access
- you cannot follow the product's ventilation or chemical-safety instructions
For DollWow purchases, send the product name, order number, photographs, measurements, and a short description through live chat or [email protected]. We can help identify the next practical path before a small issue becomes harder to correct.
Care 365 And Lifetime Repair Concierge
Every DollWow doll includes Care 365 under the current Care for Life terms. The original purchaser can request an appropriate basic repair kit for a documented minor repair, with shipping, taxes, and duties paid by the customer. Lifetime Repair Concierge continues after the first year with diagnosis, compatible instructions, parts help, and repair coordination.
Eligibility does not make every issue a home repair. The first job is to identify the material, damage category, and safest next step.
Preventing Silicone Damage
- Lift and reposition the doll with the body supported.
- Do not pull a limb, finger, toe, head, or opening to move the doll.
- Respect the manufacturer's joint ranges and stop at unexpected resistance.
- Protect the surface from sharp jewelry, zippers, rough flooring, and furniture edges.
- Use compatible lubricant where relevant to reduce friction.
- Keep dark dyes and printed materials away during storage.
- Clean gently and dry fully before storage.
- Avoid concentrated pressure on the face, breasts, buttocks, fingers, toes, and painted areas.
- Keep powered components dry and follow charging instructions.
- Inspect seams and high-stress areas during routine care.
Use the cleaning guide, storage guide, and maintenance checklist as one ownership system.
Common Silicone Repair Mistakes
Treating every silicone as identical
Softness, cure system, pigmentation, finish, and internal construction can change the repair materials and method.
Using TPE solvent on silicone
TPE repair products are not a substitute for a compatible silicone system.
Using bathroom sealant or household glue
An adhesive that sticks to a surface is not necessarily flexible, color-compatible, safe for the finish, or suitable for repeated movement.
Repairing color loss with structural glue
Paint and finish restoration require a separate plan from closing a tear.
Moving the area before full cure
Early flexing or pressure can weaken the repair even when the surface appears dry.
Attempting internal work without support
Injection, cutting, wiring, skeleton, gel, and electronics work can make a recoverable issue much worse.
Silicone Repair Checklist
- [ ] Confirm the exact brand, model, silicone construction, softness, and skin tone.
- [ ] Support the doll and remove tension from the area.
- [ ] Photograph the location, depth, scale, and nearby structure.
- [ ] Separate tears, paint loss, stains, loose components, and internal concerns.
- [ ] Check for seams, joints, standing hardware, wiring, gel, and electronics.
- [ ] Request the compatible adhesive, pigment, or repair path.
- [ ] Read all label safety, mixing, ventilation, and curing directions.
- [ ] Practice on an approved matching sample where available.
- [ ] Protect the surrounding finish during application.
- [ ] Keep the repair supported through the full cure.
- [ ] Inspect the bond and cosmetic finish separately.
- [ ] Keep the repair record with the order or Doll Passport.
Manufacturer Reference
This official source demonstrates product-specific silicone and TPE repair paths. It should not be copied to an unrelated brand without confirmation:
FAQs
Can a torn silicone sex doll be repaired?
Many small, clean tears may have a supported repair path. The result depends on the silicone system, softness, location, depth, missing material, paint, tension, and internal construction. Confirm the product and method before applying adhesive.
What glue works on a silicone sex doll?
Use only a silicone repair system approved for the exact doll or formulation. Household super glue, bathroom sealant, craft adhesive, nail glue, and TPE solvent are not reliable substitutes.
Can I use TPE glue on silicone?
No universal rule supports that substitution. TPE and silicone use different repair systems. Confirm which part is damaged, especially on a silicone-head and TPE-body hybrid.
How long does silicone repair glue take to cure?
Curing time depends on the approved system, mixture, amount, temperature, and manufacturer instructions. Wait through the full stated cure before moving, cleaning, dressing, or loading the area.
Can I repair missing paint with silicone glue?
Structural adhesive does not automatically restore pigment or texture. Paint and finish damage need a color-matched, manufacturer-compatible cosmetic plan.
How do I repair a silicone doll finger or toe?
Stop movement and photograph the damage first. Fingers and toes may include wire, nails, paint, and thin silicone, so they need product-specific support rather than a generic flat-surface method.
Can I use heat to repair silicone?
Do not use a soldering iron, household iron, heat gun, hair dryer, or open flame as a generic silicone repair method. Use only the exact manufacturer-supported process for that product.
What if a silicone seam is opening?
Remove tension, support the doll, and request guidance. A seam can involve construction beneath the visible surface and may need more than cosmetic adhesive.
Can I inject a collapsed gel-filled area myself?
Do not assume so. Injection systems, gel chemistry, cavity structure, and access points vary. Ask the manufacturer or Repair Concierge before using a needle, filler, or cutting tool.
How do I fix a loose nail or eyelash?
Confirm the component-specific adhesive and placement instructions. Nail, lash, wig, implanted-hair, and body-tear repairs should not be treated as the same task.
Does DollWow provide silicone repair kits?
The original purchaser can request an appropriate basic repair kit for a documented minor repair under the current Care for Life terms. Shipping, taxes, and duties remain the customer's responsibility, and support first confirms the repair category and material.
Can DollWow help with a repair after the first year?
Yes. Lifetime Repair Concierge continues to help with diagnosis, compatible instructions, parts sourcing, and repair coordination under the published Care for Life terms.